If your work requires navigating between worksheets a lot, activating those sheets can quickly become a hassle. Some VBA tips we're going to cover here can help you to create a popup list of worksheets where you want them, and save yourself from the default worksheets menu. In this article, we are going to show you how to create a worksheet selection popup in Excel.
Before starting
If you are new to VBA and macros - in a nutshell, VBA is a programming language for Office products. Microsoft allows users to automate tasks or modified properties of Office software. A macro, on the other hand is a set of VBA code, defining a calculation process.
Macros, or codes, should be written in modules, which are text areas in VBA’s dedicated user interface. Also, the file should be saved as an Excel Macro Enabled Workbook in XLSM format to keep the code.
You can find detailed instructions in our How to create a macro in Excel guide.
Creating a worksheet selection popup by VBA
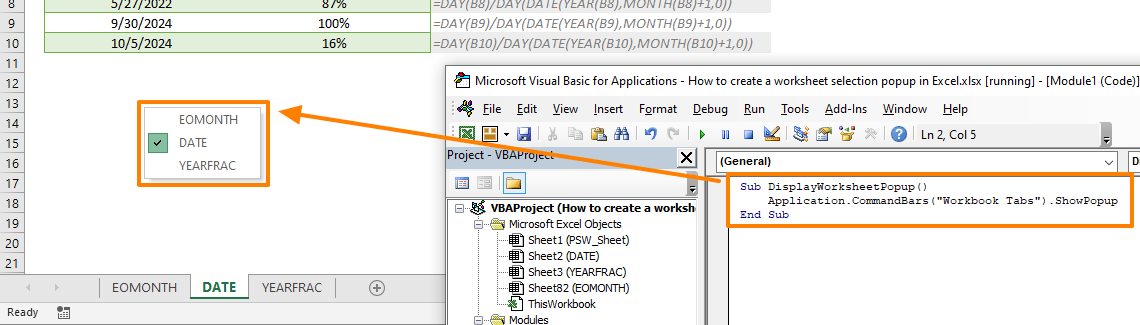
The following code will display a worksheet selection popup at where the mouse cursor is.
Sub DisplayWorksheetPopup()
Application.CommandBars("Workbook Tabs").ShowPopup
End Sub
If you run the macro right away, you will see a list of your sheets names in a popup list. Clicking on a name navigate you to that sheet.
You can either bind this to macro to a button or shortcut to run without the VBA screen.
Binding to a button
You can add a button in your worksheet from Developer tab of the ribbon. If you are not familiar with inserting controls, you can follow the steps below:
- Activate the Developer tab in the ribbon
- Press the Insert icon to see the controls
- Click on Button in Form Control section

- Click on your worksheet where you want to place the button.
- Assign Macro dialog will pop up
- Select the macro you want run when you click the button
- Click OK to create the button


Once created, you can click on the button to display worksheet selection popup.

Using a shortcut to create a worksheet selection popup
You can assign keyboard shortcuts to your custom macro as well. First you need to open the Macro window and edit the macro.
- Open the Macro window by clicking Macros icon in Developer
- Select your macro
- Click the Options button to open Macro Options dialog
- While the small textbox is active, type a character you want as a shortcut
- Click OK to apply the changes

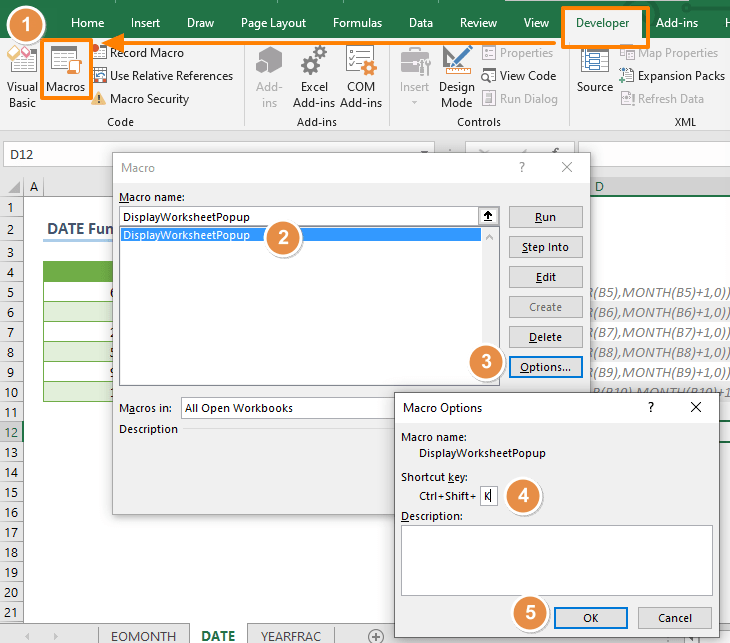
Tip: All you need to is to click a single key. Excel offers either Ctrl + your key or Ctrl + Shift + your key combination based on available (not used) shortcut. For example, if you press K, Excel gives you Ctrl + Shift + K due Ctrl + K is existed.
Setting the popup location
If you are OK with the location based on where your mouse is pointing you can use the code provided as is. On the other hand, you can also set a specific location by specifying the coordinates.
You need to determine pixel coordinates after ShowPopup command. Excel counts pixels by starting from the top left. For example, to open at the target 500px left and 250px below the top left cell, use the following code:
Sub DisplayWorksheetPopup()
Application.CommandBars("Workbook Tabs").ShowPopup 500, 250
End Sub

A versatile code
The worksheet selection popup has a 16-items limit. If you have more than 16 sheets, you will see 15 of the worksheets and a More Sheets item which opens the Activate window. The Activate window is a dialog that lists all worksheets.

As a result, there are 2 similar windows. By the following code you can call either one according the number of sheets in your workbook:
Sub VersatileDisplayWorksheetPopup()
If ActiveWorkbook.Sheets.Count > 16 Then
Application.CommandBars("Workbook Tabs").Controls("More Sheets...").Execute
Else
Application.CommandBars("Workbook Tabs").ShowPopup
End If
End Sub