You may want to set an expiration date for a workbook and prevent access for when creating a trial application, or simply ensuring that the application data is up to date. Unfortunately, Excel doesn’t have a built-in tools to handle this scenario, but you can use VBA to build this feature on your own. In this guide, we're going to show you how to set an Excel expiration date using VBA to prevent access to the workbook after expiration.
Security of expiration date
Before starting, we should mention that VBA-based solutions are never foolproof. Excel and VBA protection methods are created to prevent the users from changing a value or a formula “accidentally”.
Anyone can stop the Workbook_Open event from running by holding the Shift key when opening the workbook. And you need to Workbook_Open event to fire your actual macro when the workbook opens. Another workaround is to break the protection of VBA and workbook with "brute force" attacks.
Although, this security method isn’t enough for an experienced user, your file will be safe for most Excel users.
Two methods for setting an expiration
There are two approaches to set an Excel expiration date. You can either set a static date regardless of when user starts to use, or set a number of days which starts when user opens the file first time. Let’s check both.
Static Expiration Date
This approach assumes that you want to prevent workbook usage after the specified date. The following code checks if the current date (Date) is greater than expiration date (exp_date). If it is, then the macro closes the workbook with a “trial expired” message.
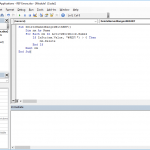
Private Sub Workbook_Open()
  Dim exp_date As Date
  exp_date = "12/31/2020" 'update this
  If Date > exp_date Then
    MsgBox ("Trial period has expired")
    ActiveWorkbook.Close
  End If
  MsgBox ("You have " & exp_date - Date & " days left")
End Sub
Copy this code block into the ThisWorkbook object of your file and edit the exp_date variable to set a date.

Dynamic Expiration Date
Prefer using this approach if you want the expiration date to be set automatically when the user opens the workbook for the first time. This approach relies on calculating an expiration date based on the initial opening, and saving the date into a hidden a named range (ExpDate).
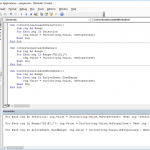
Th macro calculates the dynamic expiration date by summing up the current date and the constant specifies number of days until expiration (NUM_DAYS_UNTIL_EXPIRATION).
' Update this variable to set your own expiration period by number of days
Private Const NUM_DAYS_UNTIL_EXPIRATION = 30Private Sub Workbook_Open()
Dim ExpDate As String
On Error Resume Next
ExpDate = Mid(ThisWorkbook.Names("ExpDate").Value, 2)
If Err.Number <> 0 Then
' Name doesn't exist.
' Calculate new expiration date
ExpDate = CStr(DateSerial(Year(Now), _
Month(Now), Day(Now) + NUM_DAYS_UNTIL_EXPIRATION))
' Create a named range and store the date in the named range
ThisWorkbook.Names.Add Name:="ExpDate", _
RefersTo:=Format(ExpDate, "short date"), _
Visible:=False
' Save the file
ThisWorkbook.Save
End If' Comapare today and expriation date
If CDate(Now) > CDate(ExpDate) Then
' Expired
MsgBox "This workbook trial period has expired.", vbOKOnly
ThisWorkbook.Close savechanges:=False
End IfEnd Sub
To use this method, copy this code block into the ThisWorkbook object, and edit the NUM_DAYS_UNTIL_EXPIRATION constant as necessary.

How to protect the VBA code
No matter which approach you choose, you need to protect your VBA code from unwanted changes. Otherwise, anyone removing the expiration date control will be able to circumvent this protection. To protect your VBA code, follow the steps:
- Open the VBA window
- Open Tools > VBAProject Properties
- Activate the Protection tab
- Check the Lock project from viewing option
- Fill password fields
- Click OK