Although CSV stands for comma-separated values, it has become a common file type to define simple text files including delimiter-separated data. Thus, a CSV file can use a semicolon or tab character as a delimiter as well. In this guide, we’re going to show you how to change CSV delimiter in Excel.
Changing the delimiter in Excel Options
The first approach in our article is about changing how Excel evaluates CSV files including saving. You can make Excel using semicolon (;) as the delimiter.
- Open Advanced Options by following File > Options > Advanced.
- In the Editing options section, find Use system operators
- Uncheck it to override the system settings.
- Set Decimal separator to comma (,) and Thousands separator to period (.).
- Clicking OK ensures that Excel uses semicolon (;) as the delimiter.


This setting allows Excel to save CSV files with semicolons (;).
Changing the CSV delimiter when importing files
Excel also allows you to change the delimiter while opening files. This is a more convenient way if you do not want to alter Excel's entire behavior. Because Excel's data import features have been updated vastly beginning with 2016, we divided this section into two parts.
Power Query - Excel 2016 and newer
Power Query allows you to choose the delimiter when creating a connection. You can find the option in the Preview dialog. You can create the connection by using From Text/CSV command in Data > Get & Transform Data.

Selecting the file opens the Preview window. Probably, the Power Query guessed the delimiter correctly. However, you can change CSV delimiter easily at a dropdown option.
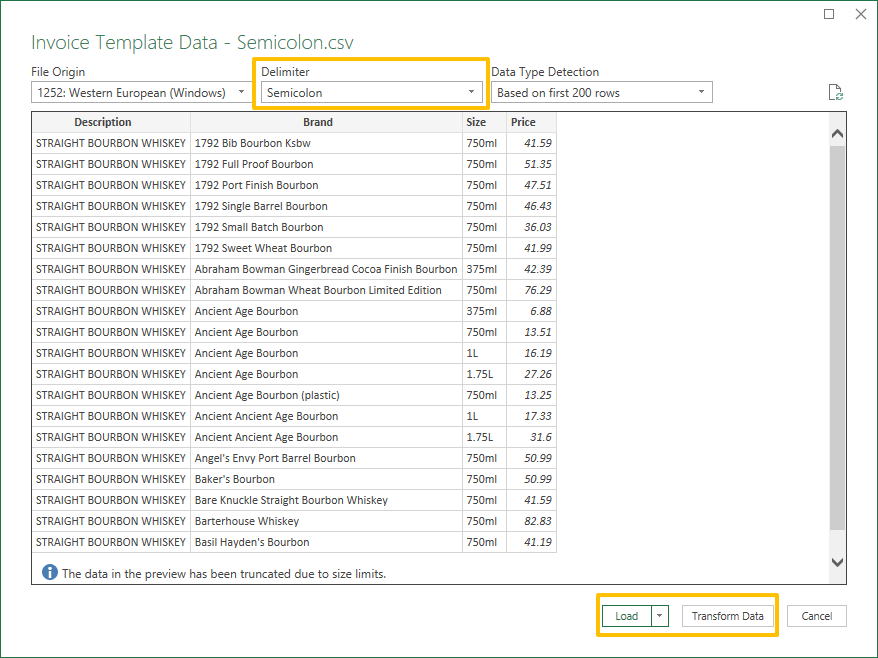
Use Load or Transform Data buttons to load the data directly into your workbook or modify it in the Power Query window respectively.
Excel 2013 or older
If you are using Excel 2013 or a previous version without the Power Query add-in, you can use Text Import Wizard which shares a similar user interface with Text to Columns wizard.
- Click Data > Get External Data > From Text to select a file and open the Text Import Wizard.
- In the first step of the wizard, make sure to select Delimited
- Click Next button to continue.

- Select one or more delimiters that fits your data. You can see if the data is separated correctly in the Data preview section.
- You can modify data types for columns at the next step. Click Next to continue the third step or click the Finish button to populate the separated data in your worksheet.