When you insert an image in Excel, it doesn't anchor to a specific cell but floats freely over the worksheet. This floating characteristic allows for easy movement of the picture but can be limiting if you aim to embed the image within a particular cell. In this article, you'll learn to utilize the 'insert image Excel' functionality, a handy feature for those frequently working with pictorial data.
Getting Ready - Inserting Images into an Excel Cell
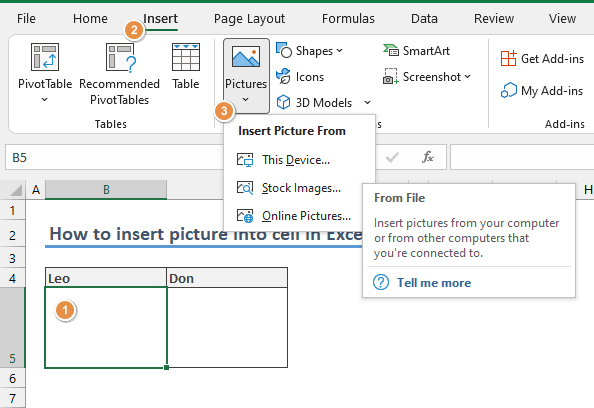
The first step involves choosing the specific cell where you want the picture placed. This is an optional step, but it helps precisely position your image. After selecting the desired cell, navigate to the Ribbon and activate the 'Insert' tab.
Once in the 'Insert' tab, look for the 'Pictures' option in the 'Illustrations' group. Here, Excel offers various methods to insert images. You can select the most suitable approach for adding your picture, whether from a local file or an online source. This flexibility in the Insert image Excel feature allows you to effectively customize your spreadsheet with relevant visuals.
Adhering to the steps outlined above, especially the initial one of selecting a specific cell leads to a key functionality in Excel: the image will automatically align to the top-left corner of the chosen cell. By following this method, the function ensures that your picture also neatly positioned.
This alignment is crucial for maintaining a clean and organized look in your spreadsheet, especially when you aim to insert a picture into an Excel cell for a structured data presentation. It ensures that every image inserted aligns consistently, providing a professional appearance to your worksheet. Whether inserting single or multiple images across different cells, this automatic snapping to the cell's top left corner simplifies arranging your visuals within the Excel framework.

How to Fit Picture into a Cell
Once you have successfully inserted your image using the 'insert image Excel' feature, you can easily adjust its size to better fit within your spreadsheet. This resizing is done by simply clicking and dragging the small circles, known as handles, located at the image's border. This method offers a straightforward way to customize the size of the picture, making it an integral part of inserting pictures in Excel effectively.
You can use the Snap to Grid function for more precise resizing, especially when aligning the image with the cell borders. This option becomes accessible in the contextual picture tab under the 'Align' options. To view and access this tab, you need to have an image selected in your worksheet. The 'Snap to Grid' feature is particularly useful for those looking to achieve a more refined and accurate placement of images, enhancing the overall neatness of your Excel document.

This example illustrates the process of resizing an image within Excel, showcasing two scenarios: resizing without the 'Snap to Grid' feature and then utilizing 'Snap to Grid' for comparison. When you insert a picture in the Excel cell and attempt to resize it without 'Snap to Grid,' you have more freedom but less precision. The image can be adjusted to various sizes, albeit without the guidance of cell boundaries. However, when you enable 'Snap to Grid' after inserting an image, Excel provides a more controlled resizing experience. This feature aligns the image with the cell borders, ensuring a neater and more consistent look. An interesting aspect to note here is that Excel restricts the image from being resized smaller than the dimensions of the target cell when 'Snap to Grid' is activated. This constraint is significant for maintaining the integrity and readability of data in your spreadsheet.

Having inserted a picture into a cell in Excel, the next step is to understand how this image will interact with the cell's behavior. This understanding is key to effectively using the 'insert image in Excel cell' feature. Here's how you can control this interaction:
Right-click on the Inserted Picture: After inserting an image into the Excel cell, the first step is to right-click on this picture. This action brings up a context menu that offers several options for customizing your image.
- Select 'Format Picture': Select the 'Format Picture' option from the menu that appears. This choice opens a new window or pane, depending on your version of Excel, where you can adjust various settings related to your image.
- Access 'Size & Properties': In the 'Format Picture' pane, locate and open the 'Size & Properties' section. This area is crucial for adjusting how your picture will behave in conjunction with the cell it's in.
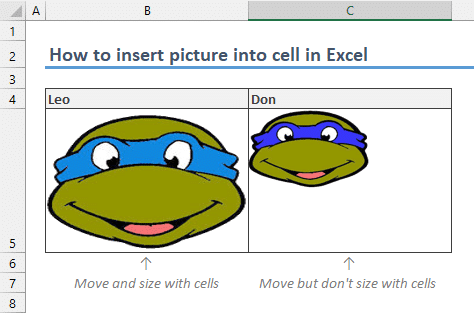
- Choose the Appropriate Option under 'Properties': You will find three options under the 'Properties' tab. To ensure your picture remains anchored appropriately within the cell, choose 'Move and size with cells' or 'Move but don't size with cells.' Each option provides a different level of flexibility and control. The first option allows your image to adjust as the cell size changes, while the second keeps the image size static even if the cell size is altered.

Now that we've covered how to insert a picture into an Excel cell, it's essential to distinguish between the two main options available for managing how these images interact with cell adjustments.
- 'Move and size with cells' Option: This option creates a dynamic link between the image and the cell. When you choose this setting after you insert an image into the Excel cell, the image will resize and move in tandem with any changes you make to the cell’s size or position. It's particularly useful when you need the image to adapt to the changing dimensions of your spreadsheet, maintaining its relative size and alignment within the cell.
- 'Move but don't size with cells' Option: Contrasting with the first option, selecting this after you insert a picture in the Excel cell ensures that the image moves along with the cell but does not change in size when the cell’s dimensions are altered. This is ideal for situations where you want the image to maintain its original size, regardless of how the cell it's in might be resized or moved around in the spreadsheet.