In the dynamic realm of data management within Excel workbooks, the presence of blank rows can be more than a mere inconvenience – it can disrupt calculations, impede organization, and complicate overall data handling. These empty spaces, if left unattended, not only hinder the seamless functioning of Excel but also serve as boundaries in various operations like sorting, filtering, and table creation. Fortunately, there exists a straightforward solution to this issue, ensuring a streamlined and clutter-free data set. In this article, we will guide you through the process of removing blank rows in Excel using an efficient method involving filters.
Steps to Remove Blank Rows in Excel
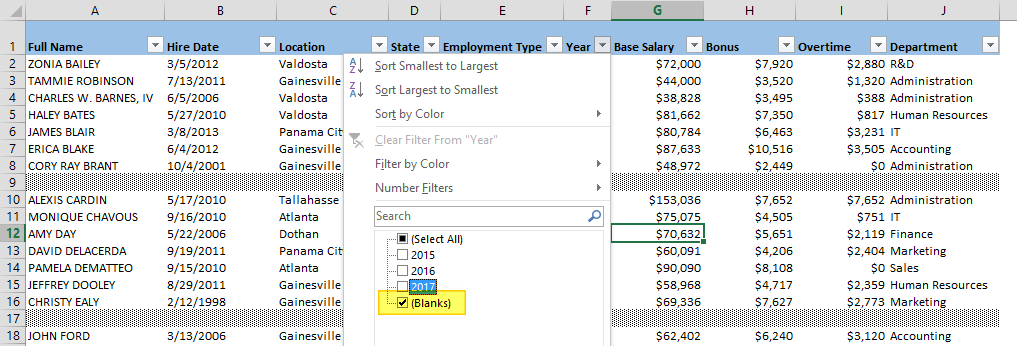
Select all your data: Begin by highlighting the range of cells that encompasses the blank rows you wish to eliminate.
Activate filters: Trigger the filtering mechanism either by pressing Ctrl + Shift + L or navigating to DATA > Filter in the ribbon.
Filter for blanks: Within the filter options, exclusively select the (Blanks) item and confirm your selection by clicking OK.
Exclude blank rows: With the filter applied, the blank rows are now hidden. Proceed to select all visible data, either through Ctrl + - or using the Delete Row option in the right-click menu, to remove the unwanted rows.
Clear the filter: Once the blank rows have been expunged, clear the filter to reveal the remaining cells containing valuable data.
This method ensures a quick and efficient way to tidy up your Excel workbook, enhancing data accuracy and facilitating smoother analytical processes.
In the intricate landscape of Excel data management, the presence of blank rows can prove to be a formidable challenge. By employing the simple yet powerful technique outlined above, you can effortlessly remove these impediments, paving the way for a more organized and efficient Excel workbook. Whether you are engaged in complex calculations, data analysis, or simply seeking a cleaner interface for your information, the process of removing blank rows using filters is a valuable skill to add to your Excel repertoire. For more information about organizing your data, like ordering cells in a custom order, please see the related article.